
Roku TV Black Screen With Sound? How to Find and Fix the Real Cause
If your Roku TV still plays sound but the screen stays black, don’t start replacing parts at random. The pattern of the failure can usually tell you whether the problem is an HDMI source, a temporary software state, the backlight system, or internal TV hardware. This guide walks through the diagnosis first, then shows what repair options make sense.
If your Roku TV has sound but a black screen, first press Home. If the Roku Home screen appears, the screen and backlight can produce a picture, so focus on the HDMI source, input, cable, connected device, or app. If Home stays black everywhere, disconnect external devices, perform a full power cycle, and then use the flashlight test. A faint image strongly points toward a backlight-related fault, but it does not tell you exactly which backlight component has failed.
A Roku TV that has sound but no visible picture can be confusing because the television clearly isn’t completely dead. You may hear a show playing, hear menu sounds, or see the status light react to the remote while the display looks totally black.
The mistake is assuming that every black screen means the same thing. It doesn’t. A TV that shows Roku Home but loses the picture on HDMI is very different from a TV that briefly shows the Roku logo and then goes black on every screen.
This guide is for televisions with Roku built into the TV, including models sold by TCL, Hisense, onn., Sharp, Philips, Insignia and other manufacturers. A separate Roku Streaming Stick or Roku player has a different hardware path because the Roku device connects to another television through HDMI.

Start by Reading the Symptom
Before resetting anything, watch the TV closely. The behavior during startup often tells you where to look.
| What you see | What it probably means | What to check first |
|---|---|---|
| Roku Home screen appears normally | The display and backlight can produce a picture. | HDMI source, cable, input, connected device, or app. |
| Sound works but Home never appears | The TV is running, but the picture path is failing. | Power cycle, flashlight test, display/backlight diagnosis. |
| Roku logo appears briefly, then goes black | The picture starts, then the display or backlight path stops. | Backlight, power delivery, or internal hardware. |
| Faint image appears with flashlight | The LCD is producing an image but lacks normal illumination. | Backlight-related system. |
| Only one HDMI input or app is black | The physical display is probably working. | That input, cable, device, or app. |
Roku TV Black Screen With Sound: Diagnose It in This Order
Confirm the TV Is Responding
Turn the TV on and press Volume Up, Home and a few directional buttons. Listen for audio or menu sounds and watch the status light.
If the light reacts and sound works, at least part of the TV is booting normally. That makes a complete no-power failure much less likely.
If there is no sound, no status light and no response at all, you are dealing with a different power problem rather than the specific black-screen-with-sound symptom covered here.
Press Home Before Blaming the Screen
Press the Roku Home button a few times and wait several seconds. This moves you away from an HDMI input or external source.
The screen can display a picture. Check the HDMI cable, input, connected device or app rather than opening the TV.
The fault is affecting the television itself, so continue with the next checks.
Disconnect Every External Device
Turn the TV off and remove HDMI devices, game consoles, cable boxes, soundbars, receivers, USB devices and antennas. Leave only the television power cord connected.
Turn the TV back on and press Home. If the picture returns, reconnect the devices one at a time to identify the exact cable, port or device causing the problem.
Perform a Full Power Cycle
Turn the TV off and unplug it from the wall for at least 60 seconds.
If your model has a physical Power button, hold that button for around 10 to 15 seconds while the TV is unplugged. Then reconnect the television directly to a wall outlet and test it again.
This is worth trying before a factory reset because temporary software or power-state problems can sometimes leave audio running while the picture fails to initialize.
Watch the Screen Closely During Startup
Look for the Roku logo, a brief flash of light, lines, unusual colors, part of the screen illuminating, or an image that appears for a second and then disappears.
If the Roku logo appears normally and the display then goes black while sound continues, a simple wrong-input problem becomes less likely.
Do the Flashlight Test
The flashlight test is one of the quickest ways to determine whether the LCD is still producing an image.
- Turn the TV on and confirm that sound works.
- Make the room as dark as possible.
- Hold a bright flashlight a few inches from the screen.
- Shine the light across the panel at an angle.
- Look closely for a faint Roku menu, shapes, movement or video.
The LCD is producing an image. The problem is likely somewhere in the system responsible for illuminating the screen.
Do not automatically buy LED strips. The main board, panel circuitry, power delivery or another display component may be involved.
A faint picture tells you that an image exists but the screen is not being illuminated normally. LED strips, their driver circuitry, power delivery or connections can create similar symptoms.
What If the Black Screen Happens Only on HDMI?
If the Roku Home screen displays correctly but a PlayStation, cable box, computer or other HDMI source is black, the backlight is not the first thing to suspect.
- Confirm the external device is powered on.
- Disconnect and reconnect the HDMI cable firmly.
- Try another HDMI port.
- Try another known-good HDMI cable.
- Restart the connected device.
- Test that device on another display if possible.
If only one app produces a black screen while Roku Home and other apps work, troubleshoot that app rather than the physical display.
Should You Factory Reset the Roku TV?
Factory Reset can help some software problems, but it should not be the first step because it removes settings and requires setup again.
If you reach that stage, follow Roku’s official factory reset instructions rather than guessing at button combinations.
When the Problem Starts Looking Like Hardware
Hardware becomes more likely when:
- Sound works but Roku Home never becomes visible.
- A faint picture appears during the flashlight test.
- The Roku logo appears and then the screen goes dark.
- The display flashes, shows lines or only partially lights.
- The problem occurs on every app and every input.
- Power cycling temporarily restores the picture but the problem returns.
Could the LED Backlights Be Bad?
Yes. Failed LED strips are one possible reason for a screen that still produces a faint image but has no normal illumination.
They are not the only possibility because the LEDs rely on power and driver circuitry.
Could the Power Board Cause a Black Screen?
It can. Different sections of the television require different power. One power-supply section may fail while the main board and audio continue to operate.
Could It Be the Main Board or LCD Panel?
Yes. If no faint image appears during the flashlight test, the possible causes become broader and can include video processing, panel circuitry, connections, the LCD panel itself or power delivery.
Don’t Replace a Board Based Only on Its Position
Roku TVs from TCL, Hisense, onn. and other manufacturers may run the same Roku platform while using very different internal hardware.
Use the exact TV model and the printed component part number when identifying replacement parts.
How to Open a Roku TV Safely Before Replacing Parts
If your testing points toward an internal hardware problem, the TV is out of warranty, and you are comfortable working carefully, opening the set lets you inspect part numbers and replace certain components.
Internal layout varies by brand and model, so use these illustrations as a general repair guide rather than a service manual for one exact TV.
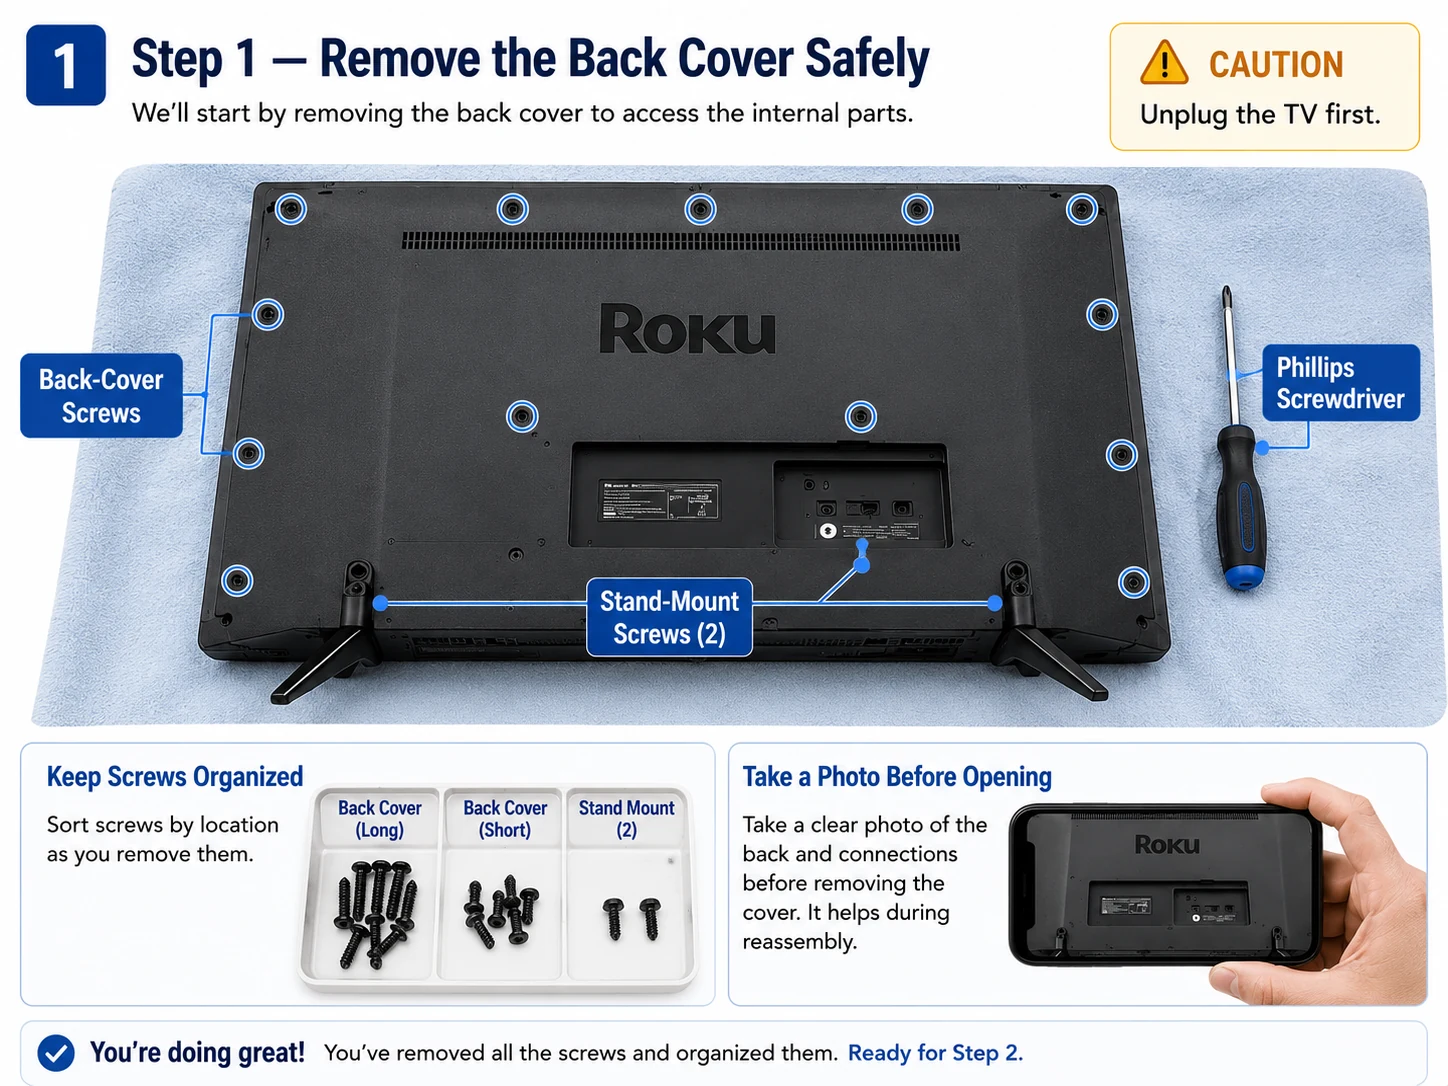
1. Protect the Screen Before Removing the Back
Disconnect the power cord and every other cable. Place the TV face-down on a large, clean and padded surface that supports the entire panel.
Remove the stand if necessary, then remove the rear-cover screws. Organize them by position because similar-looking screws can use different lengths.
If one area of the cover refuses to lift, check for another screw or plastic clip instead of forcing it.

2. Photograph Every Cable Before Disconnecting It
Take a clear photo of the entire interior, then close-up photos of every connector and board.
Depending on the model, you may see a power supply board, main board, speakers, panel connections and backlight wiring. Some TVs use a separate T-Con board while others integrate the relevant circuitry differently.
Never pull connectors by their wires. Release locking tabs where present and pull on the connector body. Treat ribbon cables especially carefully.
Power-supply circuitry can involve hazardous voltage and stored energy. Live power-board measurements should be left to someone trained to work safely on energized electronics.

3. Treat the LCD Panel as the Most Fragile Part
Replacing a main board or power board normally does not require removing the LCD. LED backlight replacement usually does because the LEDs sit behind the display and optical layers.
Remove the bezel or retaining frame carefully and confirm that all panel ribbons and retaining points are released before lifting the LCD.
The LCD glass is extremely thin and can crack from bending even if nothing strikes it.
Lift the LCD evenly from both sides and keep it flat. Never lift it by one corner, let the center sag, twist it or press on the viewing area.
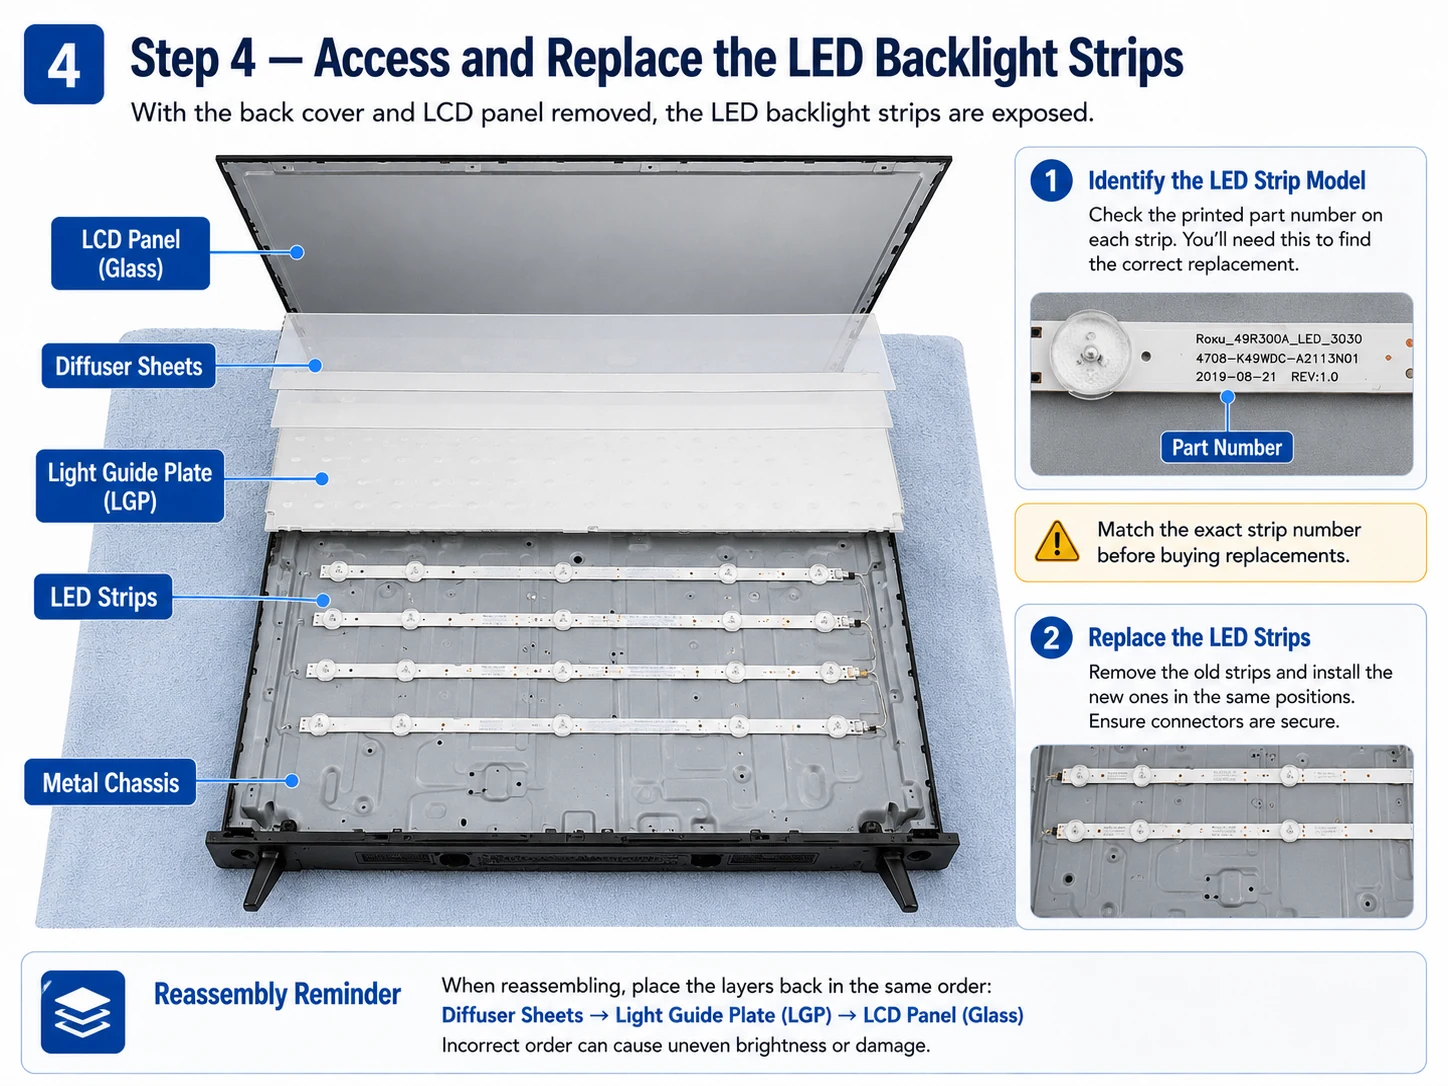
4. Keep the Optical Layers in Their Exact Order
Under the LCD are diffuser sheets and a light guide that spread the LED light evenly across the display.
Photograph each layer before removal and preserve its exact orientation. Keep dust, fingerprints, hair and debris away from the optical surfaces.
Once these layers are removed, the LED strips become accessible on the metal chassis.
How to Find the Correct Replacement Part
Don’t buy a component only because an online listing says it fits a “55-inch Roku TV.” Screen size and brand are not enough to confirm compatibility.
Look at the actual component and find its printed part number.
Compare the number printed on the original strip, its length, LED spacing, connector location and revision.
Use the actual board part number. Similar TV models can use different board or panel revisions.
A television with a physically cracked LCD can sometimes supply compatible boards, speakers, cables or other working components.
Parts can be found through electronics-parts suppliers, local TV repair shops, online marketplaces and televisions sold for salvage.
Two televisions can share the same brand and screen size while using different internal hardware.
Replacing the LED Backlight Strips
If diagnosis confirms failed LED strips, remove the old strips carefully and install compatible replacements in the same positions and orientation.
Make sure the strips sit flat against the chassis and their connectors are fully seated.
When one strip has failed in an older set, replacing the complete matched LED set can make more sense than replacing only one strip while leaving similarly aged LEDs in place.
Reassemble Everything in Reverse Order
Return the light guide and diffuser sheets in exactly the same order and orientation. Lower the LCD evenly, reconnect the panel ribbons, reinstall the bezel, reconnect internal cables according to your photos, and reinstall the rear cover.
Make sure no cables are pinched before tightening the chassis and trim.
When Is the Repair Worth Doing?
An inexpensive LED strip set or compatible board can make sense on a newer or larger television.
A cracked LCD panel is different. The panel is usually one of the most expensive components and often makes repair economically unattractive.
TCL, Hisense, onn. and Other Roku TVs Are Different Inside
Roku OS can look similar across multiple brands while their internal hardware is completely different.
Use Roku’s manufacturer support directory to locate the correct hardware manufacturer for your TV.
When You Should Stop the Repair
- Smoke or a burning smell.
- Electrical arcing or sparks.
- Damaged power wiring.
- Unusual overheating.
- A cracked LCD panel.
- Diagnosis requires energized power-supply measurements you are not trained to perform.
TCL also provides an official Roku TV no-video troubleshooting guide for distinguishing simple input problems from possible hardware faults.
The Bottom Line
When a Roku TV has sound but the screen is black, start by asking: Can the television still display the Roku Home screen?
If Home appears, troubleshoot the HDMI source, cable, device or app. If the screen remains black everywhere, disconnect external devices, perform a full power cycle and use the flashlight test before buying parts.
A faint image is a strong clue that the backlight system is involved, but it is not a complete parts diagnosis.
Only after narrowing down the failure should you open the television, record the actual part numbers and decide whether the repair is worth doing.
For more help, browse our HomeIssueLab Troubleshooting Guides or visit the Home Tech & Wi-Fi section .
Frequently Asked Questions
Why does my Roku TV have sound but no picture?
Possible causes include an HDMI or source problem, temporary software state, backlight fault or another internal display problem.
Does a faint flashlight image prove the LED strips are bad?
No. It strongly suggests a problem in the backlight path, but it does not identify the exact failed component.
Can I replace Roku TV LED strips myself?
It is possible on many models, but reaching the LEDs usually requires removing the fragile LCD panel and optical layers.
Can I use parts from another broken Roku TV?
Sometimes. Compatibility should be confirmed using component part numbers rather than brand and screen size alone.
Is a cracked LCD Roku TV worth repairing?
Often it is not economical because the LCD panel is usually one of the most expensive components in the television.
Official References
The diagnostic recommendations in this guide are cross-checked against current manufacturer and Roku support information.